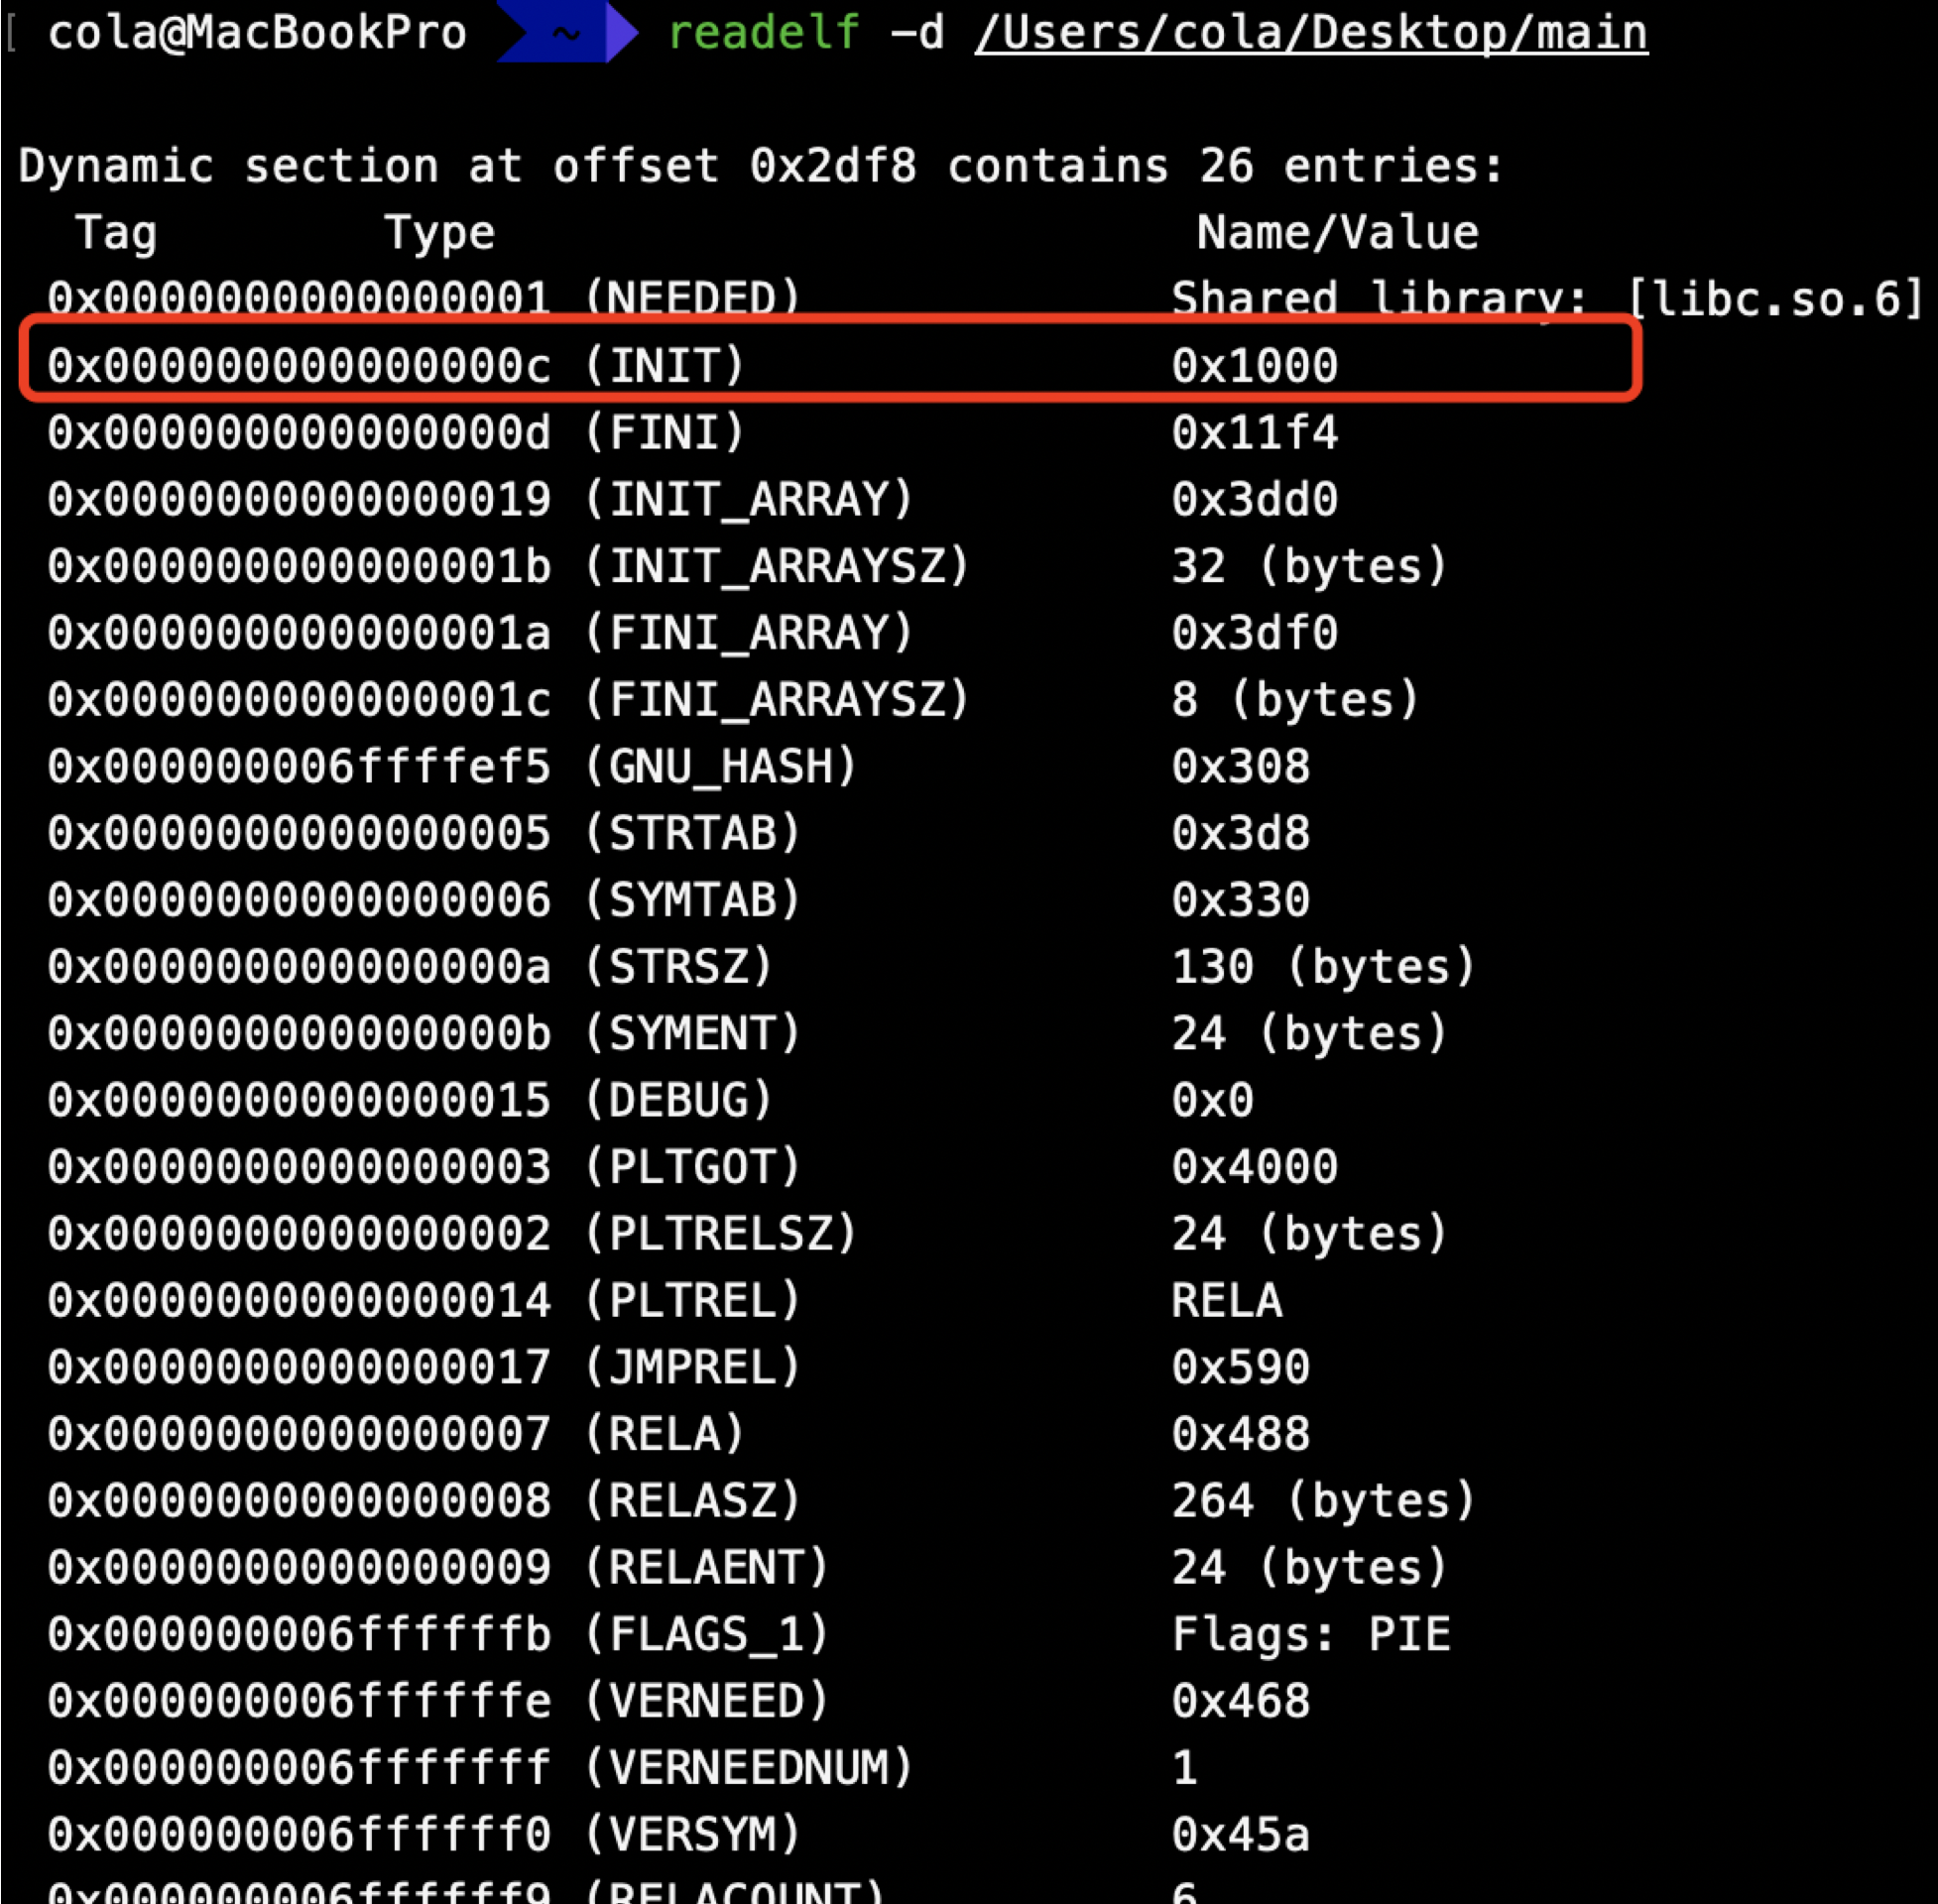
加载运行流程 1. _init 1 extern "C" void _init(void ) { }
编译生成后会在.init段
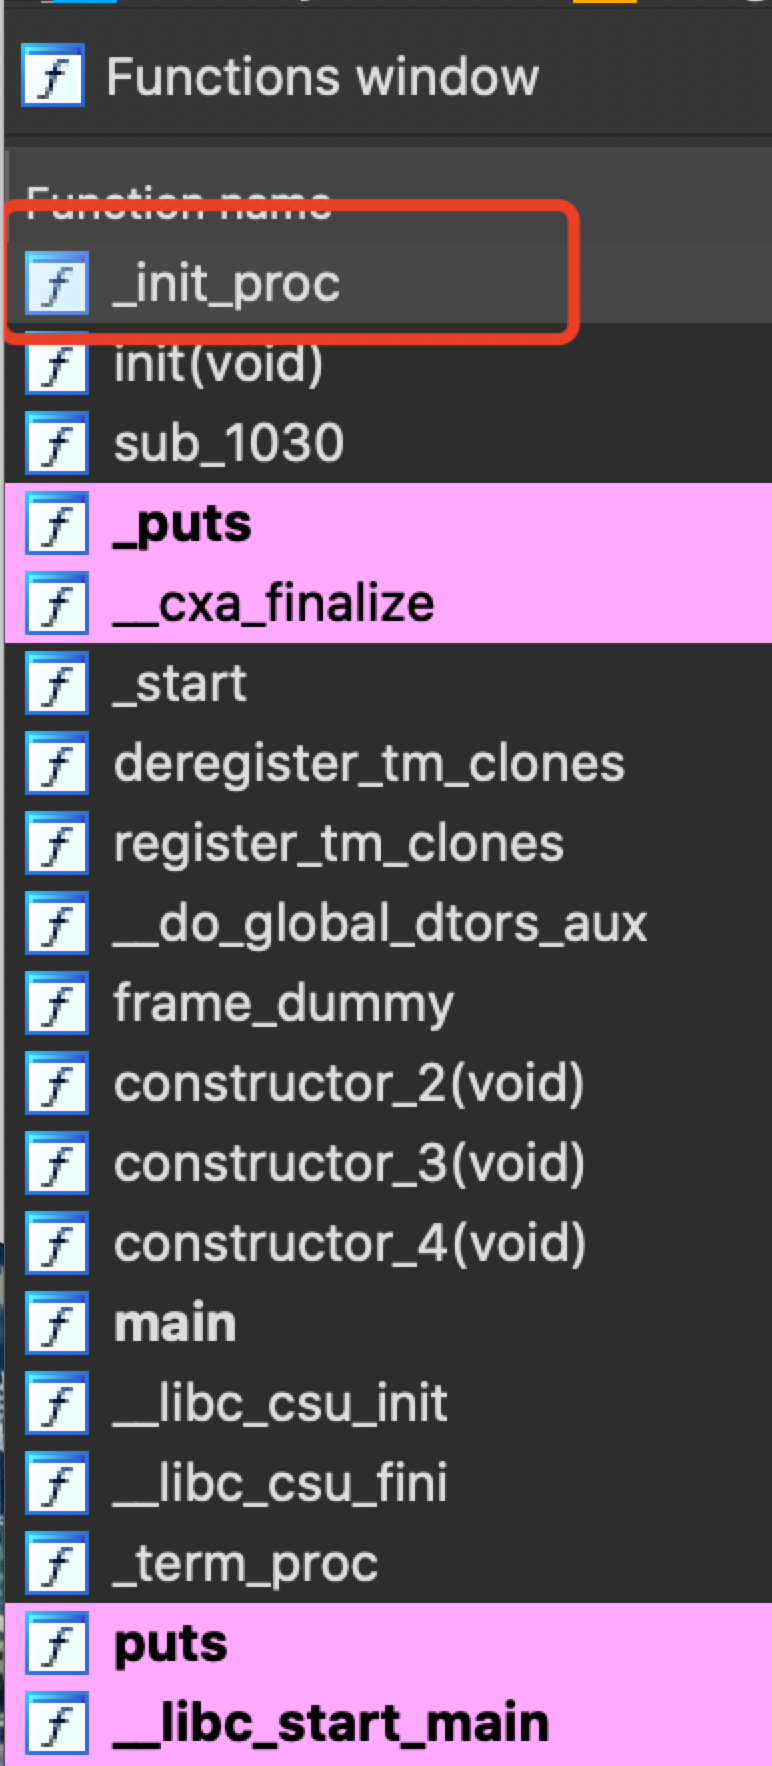
IDA反编译对应_init_proc方法
2. constructor 1 2 3 4 5 6 7 8 9 10 11 __attribute__( (constructor (1) ) ) void aaaa ( void ) __attribute__ ( (constructor (2) ) ) void aaaa ( void )
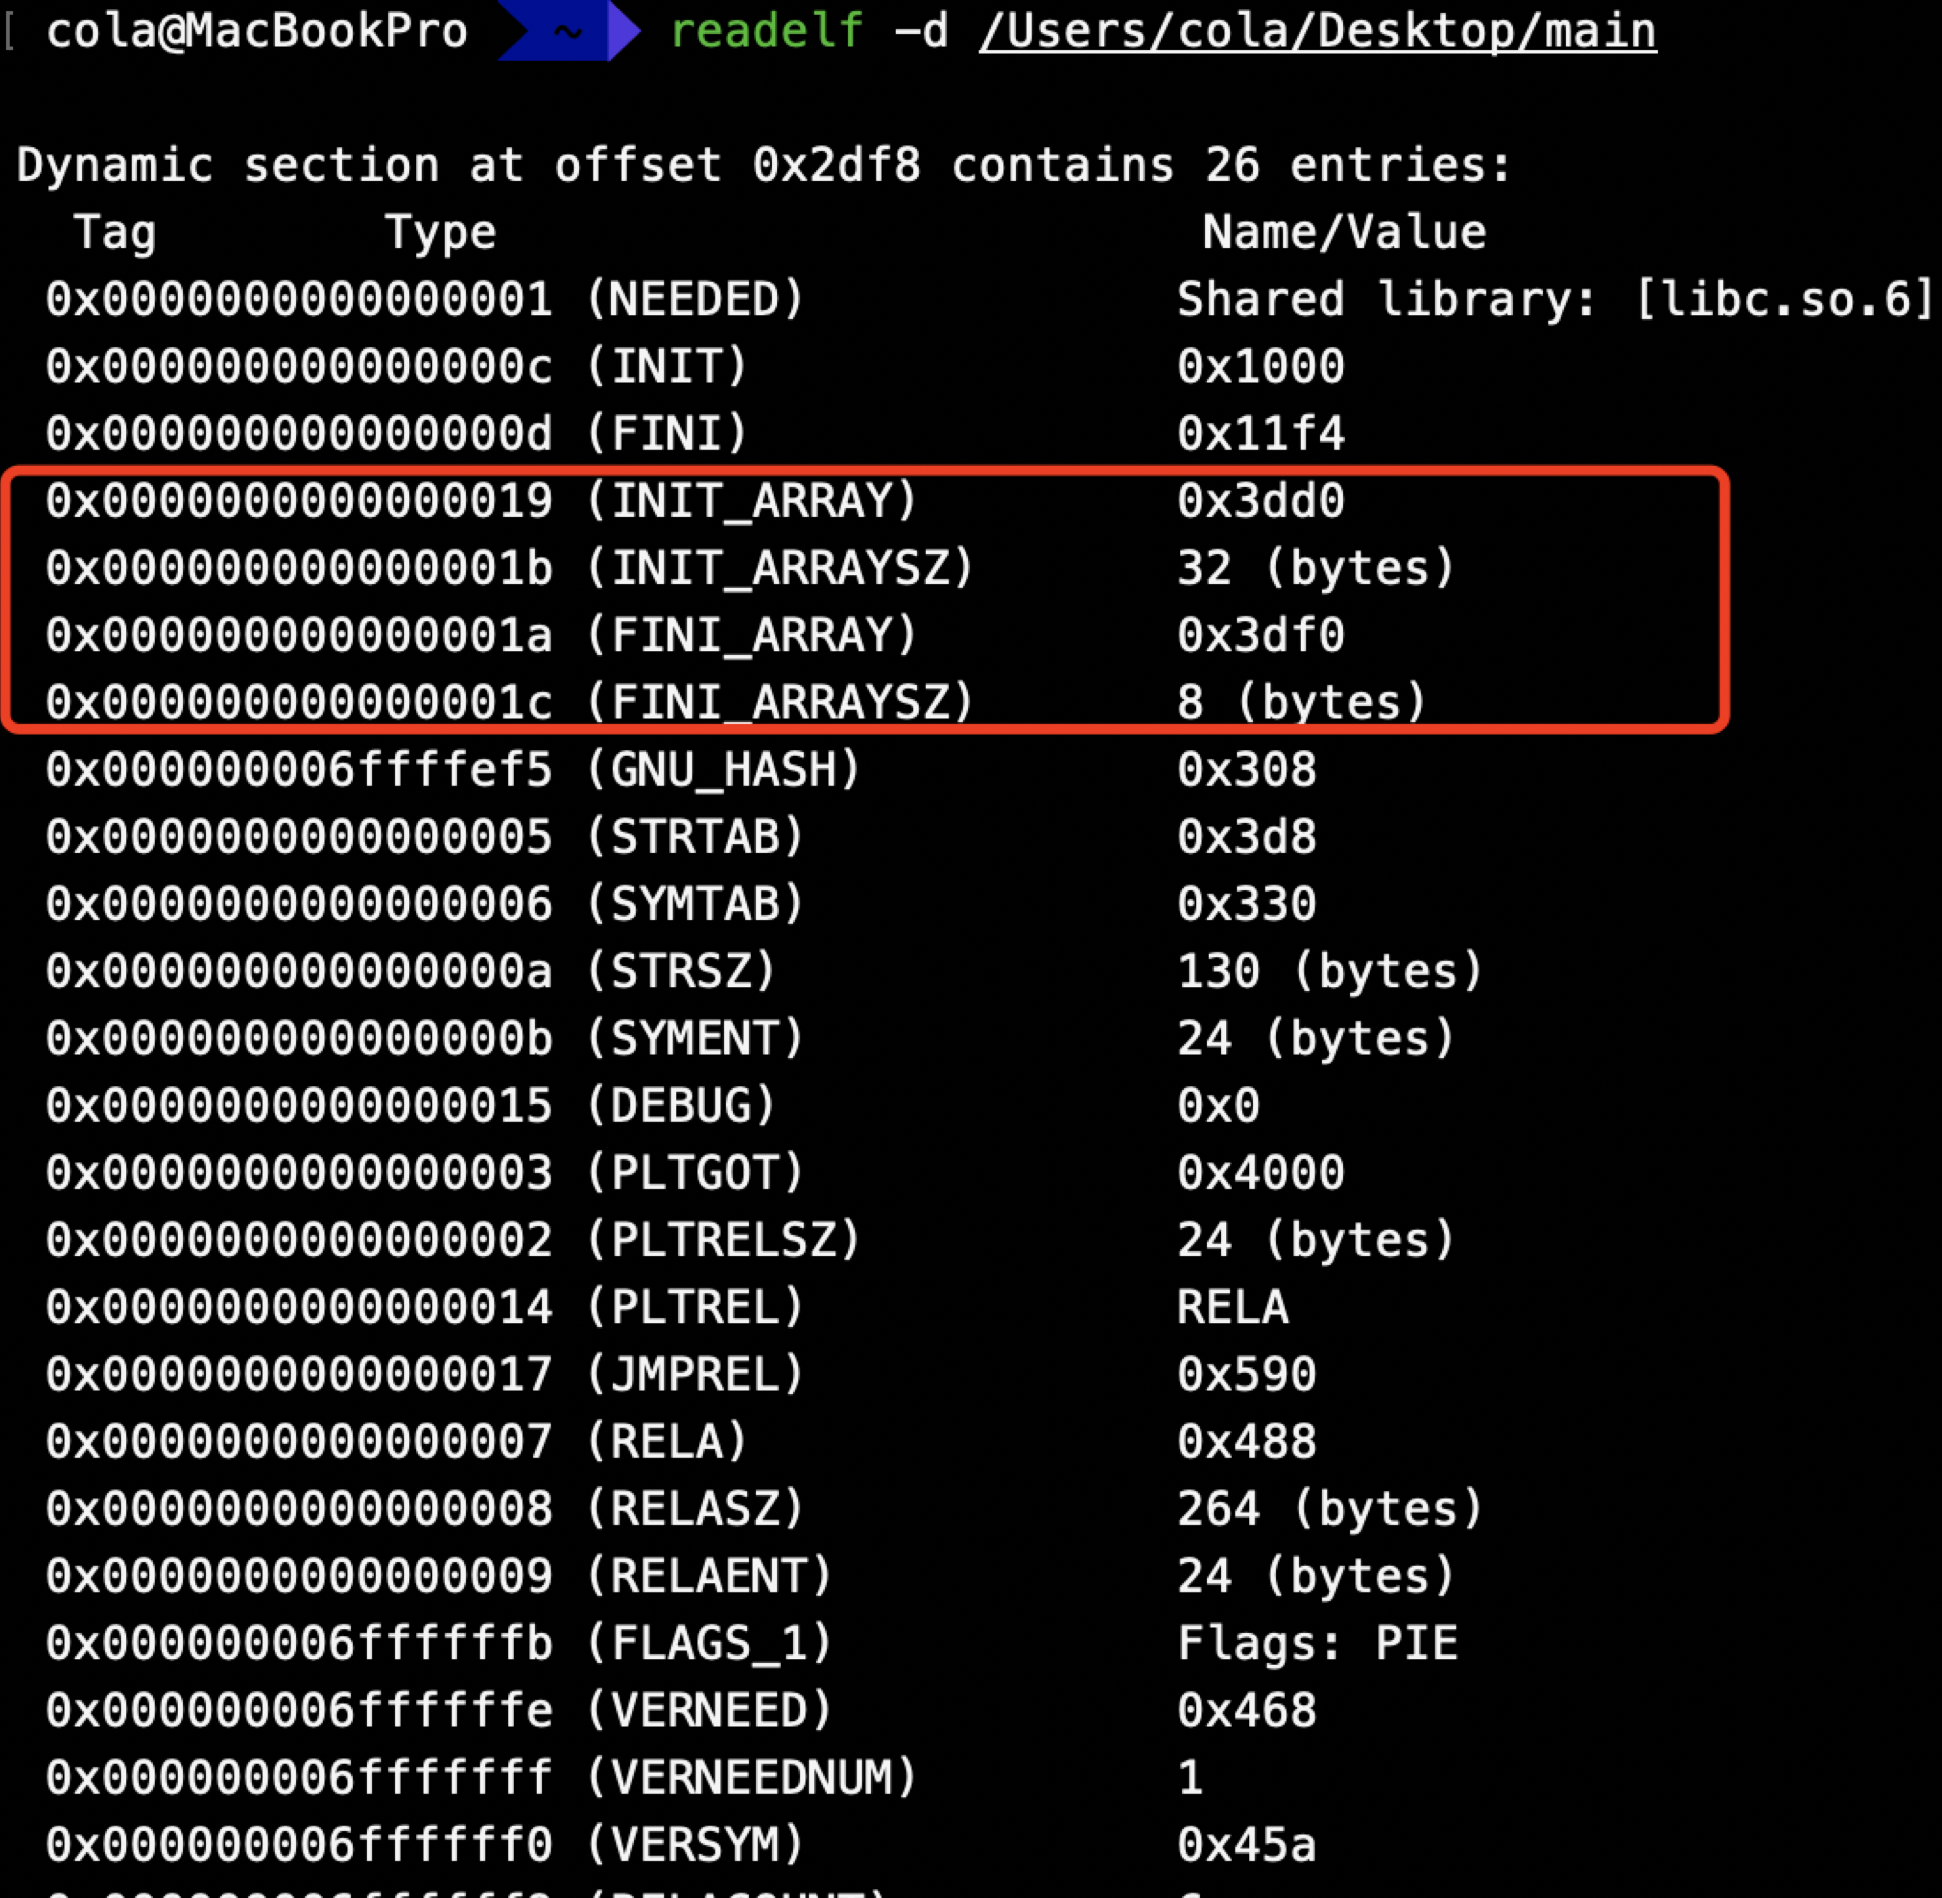
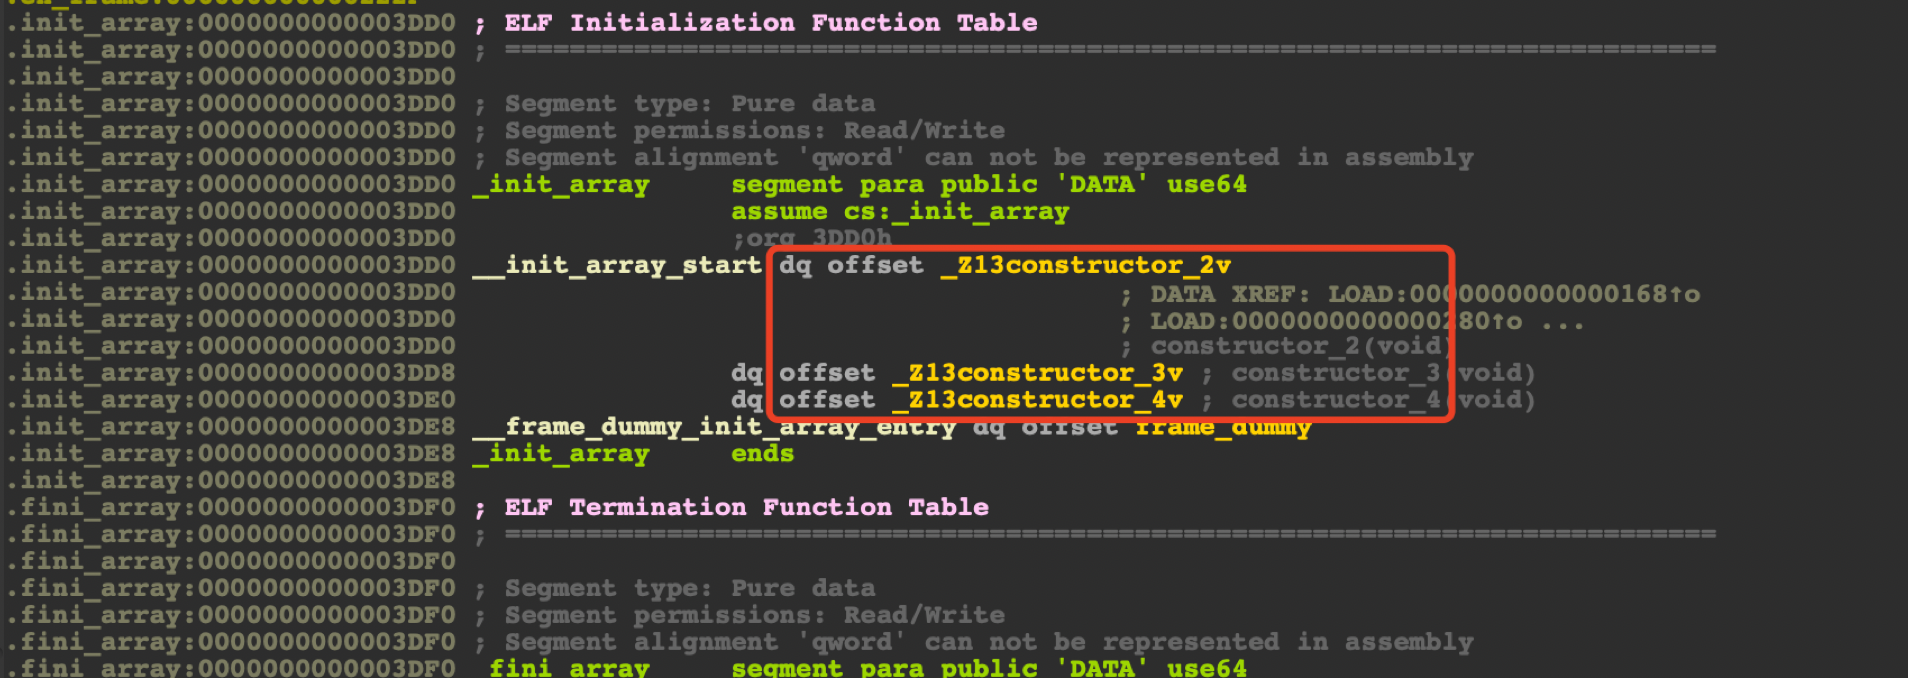
根据设置的优先级依次调用,编译生成后会在.init_array段
IDA分析 ctrl+s定位到.init_array段
点击进入方法实现
3. JNI_OnLoad 1 2 3 4 5 JNIEXPORT jint JNICALL JNI_OnLoad (JavaVM* vm, void * reserved) {LOGI ("jni onload called" );return JNI_VERSION_1_4;
源码分析(Android10) Android加载动态库有三种方式
java load so System.loadLibrary与System.load的实现在/libcore/ojluni/src/main/java/java/lang/System.java中
最终都会调用/libcore/ojluni/src/main/java/java/lang/Runtime.java下的native方法nativeLoad
因为System.load 的入参不是so文件的绝对路径,所以在系统需要从java.library.path属性中获取系统库的地址,遍历该so文件在哪个路径下,最终返回绝对路径,一般的java.library.path为
nativeLoad的JNI实现在/libcore/ojluni/src/main/native/Runtime.c中
1 2 3 4 5 6 JNIEXPORT jstring JNICALL Runtime_nativeLoad (JNIEnv* env, jclass ignored, jstring javaFilename, jobject javaLoader, jclass caller) return JVM_NativeLoad(env, javaFilename, javaLoader, caller);
调用/art/openjdkjvm/OpenjdkJvm.cc下得JVM_NativeLoad方法
1 2 3 4 5 6 7 8 9 10 11 12 13 14 15 JNIEXPORT jstring JVM_NativeLoad (JNIEnv* env, jstring javaFilename, jobject javaLoader, jclass caller) Current ()->GetJavaVM ();bool success = vm->LoadNativeLibrary (env,c_str (),ExceptionClear ();return env->NewStringUTF (error_msg.c_str ());
调用当前文件中的LoadNativeLibrary方法
1 2 3 4 5 6 7 8 9 10 11 12 13 14 15 16 17 18 19 20 21 22 23 24 25 26 27 28 29 30 31 32 33 34 35 36 37 38 39 40 41 42 43 bool JavaVMExt::LoadNativeLibrary (JNIEnv* env, const std::string& path, jobject class_loader, jclass caller_class, std::string* error_msg) void * handle = android::OpenNativeLibrary (GetTargetSdkVersion (),empty () ? nullptr : caller_location.c_str ()),get (),bool was_successful = false ;void * sym = library->FindSymbol ("JNI_OnLoad" , nullptr );if (sym == nullptr ) {true ;else {VLOG (jni) << "[Calling JNI_OnLoad in \"" << path << "\"]" ;using JNI_OnLoadFn = int void *);reinterpret_cast <JNI_OnLoadFn>(sym);int version = (*jni_on_load)(this , nullptr );if (version == JNI_ERR) {StringAppendF (error_msg, "JNI_ERR returned from JNI_OnLoad in \"%s\"" , path.c_str ());else if (JavaVMExt::IsBadJniVersion (version)) {StringAppendF (error_msg, "Bad JNI version returned from JNI_OnLoad in \"%s\": %d" ,c_str (), version);else {true ;SetResult (was_successful);return was_successful;
最终调用了android::OpenNativeLibrary方法加载SO文件,加载成功后会查找符号表是否有JNI_OnLoad,如果有则根据JNI_OnLoad的地址进行调用,然后判断返回值version是否正确,这也是为什么JNI_OnLoad要返回版本的原因。
所以可以通过OpenNativeLibrary方法对JNI_OnLoad进行HOOK(此时SO已加载但还未执行JNI_OnLoad方法)
上面的运行流程中JNI_OnLoad排在第三位,也就是说_init和constructor在OpenNativeLibrary方法中就以执行
继续分析OpenNativeLibrary方法,在/system/core/libnativeloader/native_loader.cpp中
1 2 3 4 5 6 7 8 9 10 11 12 13 14 15 16 17 18 19 20 21 22 23 24 25 26 27 28 29 30 31 32 33 34 35 36 37 38 39 40 41 42 43 44 45 46 47 48 49 50 51 52 53 54 55 56 void * OpenNativeLibrary (JNIEnv* env, int32_t target_sdk_version, const char * path, jobject class_loader, const char * caller_location, jstring library_path, bool * needs_native_bridge, char ** error_msg) if (class_loader == nullptr ) {false ;if (caller_location != nullptr ) {android_namespace_t * boot_namespace = FindExportedNamespace (caller_location);if (boot_namespace != nullptr ) {const android_dlextinfo dlextinfo = {void * handle = android_dlopen_ext (path, RTLD_NOW, &dlextinfo);if (handle == nullptr ) {strdup (dlerror ());return handle;void * handle = dlopen (path, RTLD_NOW);if (handle == nullptr ) {strdup (dlerror ());return handle;return OpenNativeLibraryInNamespace (ns, path, needs_native_bridge, error_msg);void * OpenNativeLibraryInNamespace (NativeLoaderNamespace* ns, const char * path, bool * needs_native_bridge, char ** error_msg) if (ns->is_android_namespace ()) {get_android_ns ();void * handle = android_dlopen_ext (path, RTLD_NOW, &extinfo);if (handle == nullptr ) {strdup (dlerror ());false ;return handle;else {void * handle = NativeBridgeLoadLibraryExt (path, RTLD_NOW, ns->get_native_bridge_ns ());if (handle == nullptr ) {strdup (NativeBridgeGetError ());true ;return handle;
调用/bionic/libdl/libdl.cpp中的android_dlopen_ext方法加载SO,该方法最终会调用linker中的do_dlopen,linker的实现在/bionic/linker/linker.cpp中
1 2 3 4 5 6 7 8 9 10 11 12 13 14 15 void * do_dlopen (const char * name, int flags, const android_dlextinfo* extinfo, const void * caller_addr) find_library (ns, translated_name, flags, extinfo, caller);if (si != nullptr ) {void * handle = si->to_handle ();call_constructors ();return handle;return nullptr ;
find_library方法才是真正的加载SO,执行定位动态节、解析动态节、加载动态节 、重定位等,像SO抹头、自定义Linker等加固方式都是在这里做的文章。在低版本中加载SO文件后返回的是soinfo结构体,高版本返回的是to_handle后的指针。
do_dlopen方法调用了call_constructors
1 2 3 4 5 6 7 8 9 void soinfo::call_constructors () call_function ("DT_INIT" , init_func_, get_realpath ());call_array ("DT_INIT_ARRAY" , init_array_, init_array_count_, false , get_realpath ());
调用call_function和call_array并根据init_func_,init_array_符号地址执行对应的方法
获取符号表的实现/bionic/linker/linker.cpp中的soinfo::prelink_image方法,在find_library方法执行完成后就已获取到符号信息。
1 2 3 4 5 6 7 8 9 10 11 12 13 14 15 16 17 18 19 20 21 bool soinfo::prelink_image () case DT_INIT:reinterpret_cast <linker_ctor_function_t >(load_bias + d->d_un.d_ptr);break ;case DT_FINI:reinterpret_cast <linker_dtor_function_t >(load_bias + d->d_un.d_ptr);break ;case DT_INIT_ARRAY:reinterpret_cast <linker_ctor_function_t *>(load_bias + d->d_un.d_ptr);break ;case DT_INIT_ARRAYSZ:static_cast <uint32_t >(d->d_un.d_val) / sizeof ElfW (Addr));break ;
call_function实现
1 2 3 4 5 6 7 static void call_function (const char* function_name __unused, linker_ctor_function_t function , const char* realpath __unused )function (g_argc, g_argv, g_envp )
call_array实现
1 2 3 4 5 6 7 8 9 10 11 12 13 template <typename F>static void call_array (const char * array_name __unused,F* functions, size_t count, bool reverse, const char * realpath) int begin = reverse ? (count - 1 ) : 0 ;int end = reverse ? -1 : count;int step = reverse ? -1 : 1 ;for (int i = begin; i != end; i += step) {call_function ("function" , functions[i], realpath);
call_array最终遍历所有DT_INIT_ARRAY的地址后调用call_function方法执行。
所以对于_init和construcor方法的HOOK时机,可以选择call_function方法(SO已完成加载,_init、construcor还未执行)
Native load so native dlopen的实现在 /bionic/libdl/libdl.cpp中
1 2 3 4 5 __attribute__((__weak__))void * dlopen (const char * filename, int flag) const void * caller_addr = __builtin_return_address(0 );return __loader_dlopen(filename, flag, caller_addr);
最终会调用/bionic/linker/linker.cpp中的do_dlopen方法。
总结
java层loadso执行方法顺序 _init-->constructor-->JNI_OnLoad
NDK开发dlopen方法loadso执行方法顺序 _init-->constructor
无论Java层还是NDK开发中的dlopen最终都会调用linker的do_dlopen方法
可以选择OpenNativeLibrary、call_function完成对JNI_OnLoad、_init、constructor方法的HOOK